In today’s lesson, I learned about Live Corners, how they manipulate a shape’s corners, and different options when working with it.
Live Corners is a feature that allows you to modify the corners after the fact.
To start, create a shape that has corners by selecting a Shape Tool and clicking and dragging on the artboard. In order to activate Live Corners, go to the Tools Panel and choose the Direct Selection Tool, popping up Live Corner Widgets in the shape. These give you the ability to click and drag, modifying and rounding off the corners. By holding Option and clicking, you can cycle through different styles of the corners, like Round, Inverted Round, and Chamfer.
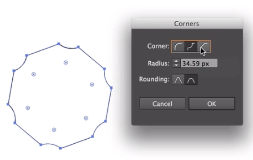
There are other ways to can modify the corners in the Control Panel or by double-clicking on a widget to pop up a dialog box. These give you the option to edit the radius, rounding, and style of the corners.
To work with one corner, find and select an anchor point with the Direct Selection Tool and that widget appears.
Good thing to note is the Maximum Angle Limit, meaning the arc cannot be any flatter based upon the 2 given points. Also the widgets only appear if you don’t have them hidden, and to make them appear, head to View and Show Widget Corners.
