In this lesson, I learned about the Pencil Tool and its usefulness when creating paths.
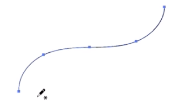
Pencil Tool creating path
The Pencil Tool inside of Illustrator is a freehand drawing tool. To start, head to the Pencil Tool in the Tools Panel and double-click, opening a box. Here you can change its fidelity, fill new pencil strokes, keep selected, toggle Option Key, and edit selected paths. There is also another option to determine whether or not the Pencil Tool will activate based upon an object.
To use the Pencil Tool, simply click and drag to create a freeform path. If you hold down Option, you can create a straight line segment. When holding down Shift, you constrain the path to 45 degree increments. Once you get back to the beginning of the path, the Pencil Tool will indicate to close the path.
Today, I learned about different Open Path Tools and their unique, unlimiting functions that change its appearance.
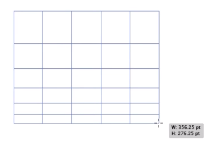
Rectangular Grid Tool skewed
To begin, head to the Line Tool in the Tools Panel, then click and hold to reveal the hidden tools. Then, click the arrow on the right side to create a tearaway where only the icons show in a box, which are Line Segment tool, Arc Tool, Spiral Tool, Rectangular Grid Tool, and Polar Grid Tool.
When working with the Line Segment tool, you can start with an anchor point by clicking, holding down, dragging. Holding down Shift will make the line snap to 45 degree increments. Holding down Spacebar will make it so that the line moves location.
When working with Arc Tool, click, hold and drag to create a starting point. By pressing the F key, you can flip the arc, and by pressing the arrow keys, you can change the radius of the arc.
With the Spiral Tool enabled, you create a spiral, and by holding Command, you can either tighten or loosen the spiral. Much like the Arc Tool, you can change the line length by using the arrow keys.
When working with Rectangular Grid Tool allows to create a grid pattern that has many functions. If you want to change the number of rows and columns, use the arrow keys. By pressing either the F and V key, you can make the top or bottom row bigger than the rest. By pressing either the C and X key, you make the left or right row larger.
The Polar Grid Tool is essentially the circular version of the Rectangular Grid Tool, which allows has many capabilities. Using the up and down arrow keys, you change the number of rings. The left and right arrow keys will change the number of segments in the grid. You also have the skewing options as well.
In today’s lesson, I learned about Live Corners, how they manipulate a shape’s corners, and different options when working with it.
Live Corners is a feature that allows you to modify the corners after the fact.
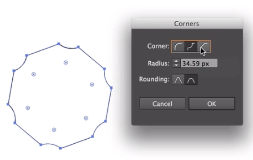
Dialog Box with Inverted Round Corners
To start, create a shape that has corners by selecting a Shape Tool and clicking and dragging on the artboard. In order to activate Live Corners, go to the Tools Panel and choose the Direct Selection Tool, popping up Live Corner Widgets in the shape. These give you the ability to click and drag, modifying and rounding off the corners. By holding Option and clicking, you can cycle through different styles of the corners, like Round, Inverted Round, and Chamfer.
There are other ways to can modify the corners in the Control Panel or by double-clicking on a widget to pop up a dialog box. These give you the option to edit the radius, rounding, and style of the corners.
To work with one corner, find and select an anchor point with the Direct Selection Tool and that widget appears.
Good thing to note is the Maximum Angle Limit, meaning the arc cannot be any flatter based upon the 2 given points. Also the widgets only appear if you don’t have them hidden, and to make them appear, head to View and Show Widget Corners.
In this lesson, I learned about the three different drawing modes and their purposes and how to use them.
Heading towards the bottom of the Tools Panel, there’s 3 little buttons. These represent the different drawing modes available to you.
Draw Inside Mode
By default, the Normal drawing mode is selected. The one to the right is called Draw Behind Mode which allows you to draw behind all of the shapes in the document or draw behind the currently selected shape. Finally, to the right, we have Draw Inside mode which means you can draw inside the currently selected objected.
To work with a Drawing Mode, select a Shape Tool, then click on a Drawing Mode.
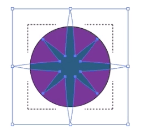
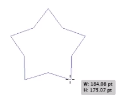
Today, I learned about the other shape tools, namely Polygon, Star, and Flare, and their different capabilities.
Star Tool
When drawing with Polygon Tool, the default shape it will create is a hexagon. To add or reduce the number of shapes, use the arrow keys. The same drawing functions of the rectangle tools are still applied to this tool.
When working the Star Tool, the same functions apply here as well, however, by holding Option, you can straighten the star.
When working with the Flare Tool, again, same functions apply here, but using arrow keys, you can change the reflection of the shape.
In today’s lesson, I learned how to draw, create , and customize shapes in Illustrator.
Rounded Rectangle Tool
On the tool bar which is on the right hand side, locate the rectangle icon. This is the Rectangle Tool and it creates rectangles, and on the flip side, you can toggle the shape by clicking and holding down, revealing the hidden tools.
By selecting the tool and clicking and dragging on the artboard, you will create a rectangle. If you want to draw out the shape from the center instead of the starting point, hold down Options. If you want to make a square, hold down Shift. If you wanna move the shape, hold down the Spacebar.
Another way you can draw a shape is to click on the artboard, popping up a dialog box with height and width measurements.
If you want to customize the shape’s appearance, head to the Control panel either by filling in color or stroke.
In this lesson, I learned the usefulness of workspaces and the configuration of them.
Workspace menu
The default workspace, Essentials, is located in the top right hand corner of the screen. When clicked, a list of options appear, which will reconfigure the interface to display the option for the particular disciplines.
If you want to save a workspace, head to Window and select a workspace, then click and drag into the Workspace Panel. If you want to add a new workspace, go back to the right hand corner, click on the workspace menu, then New Workspace.
To reset the workspace, click on workspace menu then Reset Workspace, which resets to the default layout. To remove a workspace, head to the workspace menu again then choose Manage Workspaces, which pulls up a dialog box where you can name, create or delete the workspace.
Today, I learned about the bounding box and its many functions that resize the selected image.
Image resized by height
To begin, grab your Selection Tool and click on the content in the document. Not only will that particular content be selected but a Bounding Box appears around it. This box has 8 handles, which give you the ability to resize the artwork.
If you want to increase or decrease height, you can click and drag up or down either top or bottom handle. If you want to increase or decrease width, you can click and drag right or left on the side handles. If you wanna change both, click and drag the corner handles. Additionally, if you place your cursor right outside a corner handle, a 2-way arrow appears, indicating rotation.
In today’s lesson, I learned how magnify and navigate my way inside of a document.
Normaldocument
Zoomed in on logo
There’s several ways to navigate through a document, but the most useful and commonly used techniques are the View Menu and Zoom Tool.
If you want to change the magnification of the document, head to View, and under the menu, there’s Zoom In, Zoom Out, Fit Artboard in Window, Fit All in Window, and Actual Size. If you want to zoom into the document, you can either use the Zoom Tool or the dropdown menu in the bottom-left corner.
Today, I learned about the functions of the Outline and Preview modes.
Outline mode
A feature that can be helpful when trying to look, select, and manipulate content is the Outline Mode.
When working with a group objects in Isolation Mode and needing to see a lot less detail, go to the View menu then choose Outline. Once selected, the outlines for the paths and text blocks appear. This doesn’t work on bitmap because there are no vector points to outline within a bitmap.
You can toggle between Outline and Preview mode by using the shortcut Ctrl+Y (Command+Y for Mac). Preview works by giving you the best representation what this content will look like when it prints.