Text On An Open and Closed Path

In this lesson, I learned how to create and adjust text on different paths.

Open Path Text
Closed Path Text

To add text on a path, make sure you equip the Type on a Path Tool, then hover over a path and click, allowing you to type.

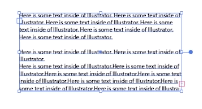
One cool thing about text on open paths is that you can move the text along the path by clicking and dragging the bar with the Selection Tool enabled. You can also thread the text to a different path and flip it upside down by dragging the text.

To add text to a closed path, create a shape, then with Type on a Path Tool, click on the edge of the shape. This pops up a blinking cursor, indicating that you can type. To control the position of text, click and drag on the bar that sticks out of the shape, moving the text. One key difference of closed paths is that the text has to be either exterior or interior.

Text Threading

In today’s lesson, I learned how to thread text between text boxes and shapes.

Text Threading above

When working with text areas, it is possible to thread from one text area to another.

To begin, copy any form of text by highlighting and Command+C. To create a new text box and deselect the text, Ctrl+Click then click and drag a new text box, then paste the text.

To thread the text, make sure the Selection Tool is equipped, then click on the red square (outport), and click again to create a new text box that’s threaded. To break the thread, double-click where the outport was. This also works with different shapes.

Paragraph Panel

In this lesson, I learned about the Paragraph Panel and it’s many different options that edit a block of text.

Indents in paragraphs

The Paragraph Panel is basically working with Paragraphs and using this means you’re going to be working with area text instead of point text.

To access the panel, click on the tab in the Type Panel, or head to Window, then Type and Paragraph.

Inside of the panel there’s alignment (left, right, or center), justification (adjusts last line of text), hyphenation (cuts of words), and indentations. You can also access additional options by going to the top right-hand corner and choosing either Justification or Hyphenation. Another option in that menu is Single-Line Composer or Every-Line Composer, which is how Illustrator evaluates the justification in lines of text.

Indentations works by put space from the paragraph and the text box, moving the text to the right. You can also indent the first line of the text, spacing before and after paragraphs.

Kerning and Tracking

In today’s lesson, I learned about kerning and tracking and their unique attributes.

Before kerning
After kerning

Kerning is the process of adding or subtracting space between specific pairs of characters while tracking is the process of loosening or tightening the spacing between the characters in selected text or an entire block of text.

To work with these options, first have the cursor in the text. Then with the Character Panel open, adjust the kerning. Notice the difference in the distance between characters in the text. To change the distance between text, highlight the text and adjust the tracking.

You can also control the kerning’s algorithm to adjust spacing. By default, it is set on Auto, which is the value of kerning that the type designer included with the font. In the drop down menu in kerning, select Optical. To contrast, the tracking drop down menu includes a range of set numbers.

Selecting Fonts

In this lesson, I learned where I can select a font and two different ways to filter out a font.

Arial – OpenType Font with included sample

Inside the Character Panel is a Font Menu with loads of fonts to choose from including the ones in the drop down menus. When selecting a font, keep in mind of the icons and samples on the right side since they tell you what type of font it is.

The search bar in the Font Menu helps filter out what font you want. This filtering system has 2 options: Search Entire Font Name which filters based on letters or Search First Word Only which autofills font names.

Character Panel

Today, I learned how to access, understand its tools, and use the Character Panel effectively.

Character Panel with Show Options

The Character Panel includes character formatting attributes, and can be applied to characters, a paragraph, or even a range of paragraphs.

In order to work with this panel, there’s several different options. If you have the Type Tool equipped, there’s a Character link in the Control Panel, and when clicked, it opens up the Character Panel. Another option is to head to the Window menu, then Type and Character.

This panel includes several different options like font, font size, kerning (distance between characters), and tracking (distance within a body of text). There’s more options if you click in the top right corner of the panel then Show Option, which includes leading (distance between lines of text), vertical scale, bassline shift, and rotation. There’s also modifiers like all or small caps, superscript or subscript, and underline or strikethrough. Furthermore, there’s an anti-aliasing option and a dictionary.

If you want to sample or copy a text, simply create a new text box and highlight the text. Then using the eyedropper tool, hover over the sampled text, click it, and it should copy the font style onto the highlighted text.

Point and Area Text

In today’s lesson, I learn about Point and Area Text and their benefits towards creating text.

Area Text box

To start, head to Text Tool inside the Tools Panel and click and hold down to reveal the hidden type tools. Each of these tools gives you the ability to type different texts, 2 of which will be focused on in here.

Point text is a type of text where it’s added to a specific point in the document and it’s the most common. With it equipped, click anywhere on the artboard, popping up a blinking cursor that allows you to type.

In contrast, Area Text is also a type of text that creates a text box. This is effective for accurate size of the text in your artwork. Using the Selection Tool, you can also resize the box.

Joining and Average Paths

In today’s lesson, I learned about Joining, Grouping ,and Averaging Paths.

Paths joined by one point

If you have two seperate objects that need to join together, you can either select both while holding Shift and move them or Command+G to group them.

Another way to join paths is by using the Direction Selection Tool and highlighting two anchor points that are close together. Then, head to the Object menu, then Path and Join. If the anchor points are nearby and need to be met in the middle, then Object, Path and Average.

Pen Tool

Today, I learned about the Pen Tool and how powerful and important this tool offers.

Pen Tool creating an open path

Even though the Pencil and Paintbrush Tool are very handy when it comes to drawing paths, the most important and complicated is the Pen Tool because it allows you to purposefully place anchor points in a path.

To use the Pen Tool, you begin by clicking to place your starting point then click on a different location and the path appears. To end an open path, hold the Command key to make the Selection Tool appear, then let go. To end a closed path, head back to the starting point and the tool should have a circle icon, indicating to close the path.

Paintbrush Tool

In today’s lesson, I learned the benefits of the Paintbrush Tool and its contrast between the Pencil Tool.

Paintbrush Tool with the stroke

Similar to the Pencil Tool, the Paintbrush Tool behaves the same way when creating paths, however, it has unique and different abilities compared to the Pencil Tool.

To begin, head to the Brush Definition box in the Controls Panel and select a different stroke. Then, using the Paintbrush Tool, notice how it automatically has that stroke applied when creating the path. This isn’t the case for the Pencil Tool since it’s set to the basic stroke first. However, unlike the Pencil Tool, the path isn’t selected right away.

If you double-click on the Paintbrush Tool icon in the Tools Panel, the same box from the Pencil Tool opens up, displaying similar options. One key difference is that Keep Selected isn’t turned on.

Design a site like this with WordPress.com
Get started